Typically after the film is telecined the transfer house will provide an .ale file or a .flx file on a disk. These files simply contain data about the material that was telecined, mainly camera roll, tape name, start and end source TC, keycode number and film type (35mm 4 perf, etc). The keycode, also known as edgecode or keynumber (KN) is a string of numbers written onto negative that assign each frame a specific value. These keynumbers, or KN for short, can be read by film scanners via a barcode. Here is a picture of keynumbers on a piece of film.

Avid allows you to import the .ale files into your bin under File>Import. If the file is a .flx file, you can convert it to an .ale file by using Avid Log Exchange. I liked using "Raw" bins that contained all my imported 35mm footage and 65mm footage. Once the material was digitized I would make subclips as needed for my different scenes. After importing the .ale files there are certain things you want to check BEFORE starting any editing.
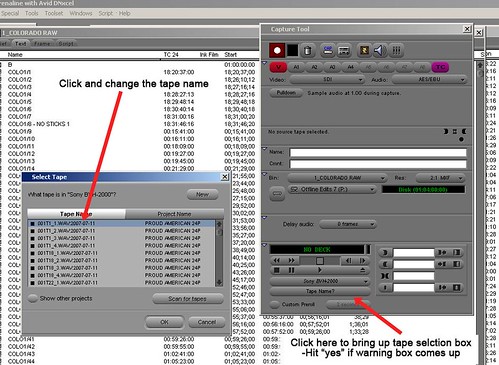
-Tape Name: This is very important to get right from the very start, otherwise it will be problematic later as many of the .EDL formats only read the first 8 letters of the tape. I suggest using a numbered system (101, 102, 103) and keep it at 8 characters or less. Typically the tape names from the telecine logs aren't what you want them to say. You can change them AFTER import by opening the digitize tool. Click on the "tape name" under the play button which will bring up a box with the existing tapes in your project. Click on the tape name you want to change and type the new name. It will ripple change everything from the old tape name to the new tape name.
Full Size
-Source TC 24: For list creation later, it is a good idea to create a TC24 column for your SOURCE material. In your "Raw" bin under the "text" bin view, click on the "Start" timecode column heading. When you do this it will highlight the entire start column. Click control+D or command+D on a Mac and it will ask you where you want to duplicate the values to. Choose TC24 and it will paste the timecode values into this column. For an explanation of TC24 see my earlier post.
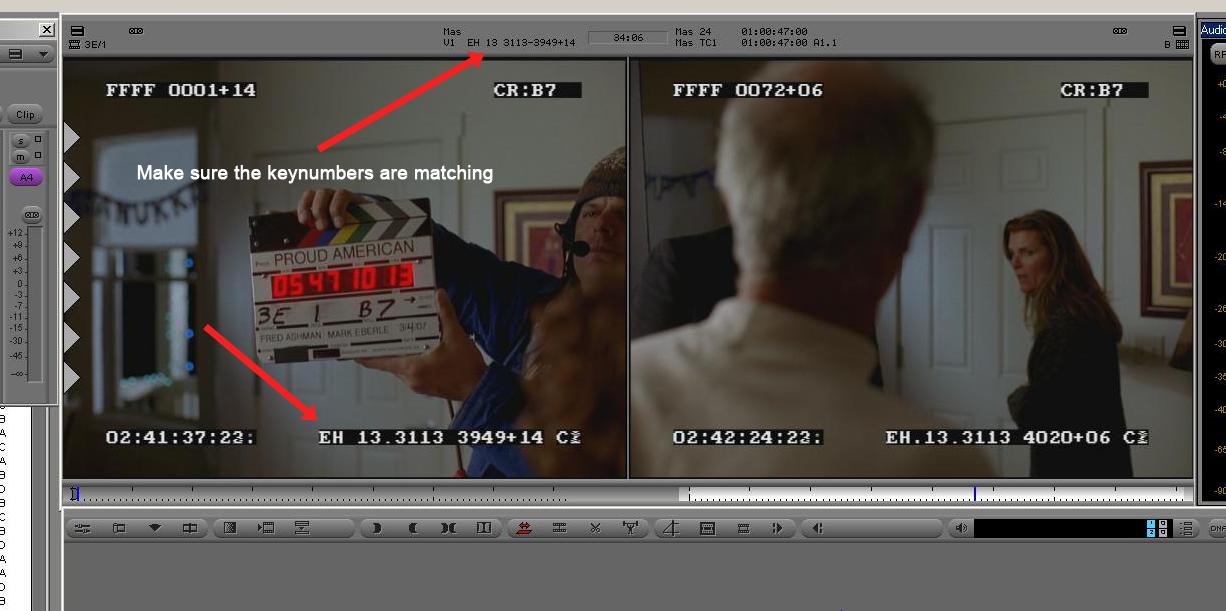
-Confirming KN numbers match: When you import your .ale, the "KN Film" column will be populated with the film type for the camera roll. If the roll is 35mm 4 perf, then the number should be 35.4, if the roll is 65mm 15 perf then the number should be 65.15. As long as the first frame keynumber is correct and the "KN Film" is correct the numbers should track fine. You can check this by loading a digitized clip in the source monitor and comparing the keynumber window burn on the picture with the Avid keynumber above the source monitor. Be sure to select the source TC type above the source window to display the "EC1" which stands for edgecode1. As you scroll through the clip the numbers should always match.

Full Size
*Note: Once you import an .ale file with a "KN Film" type, you will not be able to modify it. So if for some reason the film type is incorrect on the .ale you must open the .ale in a text edit program and replace the values with the correct film type, save, then import the .ale. You could also modify a keynumber if it was wrong for some reason. I did not have any incorrect numbers in my project but it could happen (that's why we check before starting the edit).
-Syncing Audio: For film projects the audio is recorded separately. In the old days the DAT tapes where used, but now people are using flash-based field systems. In the case of our project all the files were delivered as .wav files with embedded timecode that matched the smart slate. The smart slate (clapper) was shot before each scene and clapped. The audio was then imported and matched to the timecode on the smart slate as the clap occurred. Be sure your audio guys voice slate each take as they are recording, this will help you ID what scene you are on if you get lost. This is very helpful, trust me. Here is a smart slate picture.

-Autosyncing: I found it helpful to create a new "syncing" bin which I would drag the marked video and audio clips into. Mark your video in point where the clapper comes together and your audio in-point when you hear the clap. I recommend going frame to frame to get a good indication of when the clap occurs; the timecode from the .wav file is not always perfectly indicated on the smart slate frame (be sure to have CAP LOCK on so audio scrubbing is active). Then, after highlighting both clips, go to the menu Bin>Autosync, then choose "using in points" from the dialogue box. This will create a synced clip which you can then move into a "synced" bin for editing.
No comments:
Post a Comment