I recently edited a feature-length film on an Avid Media Composer and wanted to share some protocols and lessons learned along the way. I have been editing on Avid for the past 13 years and have dabbled a bit in Final Cut Pro as well. The concepts and work flow I discuss in this blog are the same regardless of platform.
This project was unique in the fact that we shot 35mm, 4 perf (the most common format) as well as 65mm, 15 perf IMAX footage. This footage was mixed together in the timeline which presented a variety of bookkeeping hurdles. In this blog I lay out the key concepts of film work flow, scanning, EDLs, digital conforming, answer prints and so on.
If you find value in this information please pass it on to fellow editors or user groups. Thank you.
Wednesday, October 15, 2008
Tuesday, October 14, 2008
Optical vs. Scanning workflow
Back in the "old days" a typical work flow for a film project was to generate a negative cut list from the Avid or film-editing platform, pull the appropriate reels, physically cut the negative, then splice the negative back together in the edited order. In the case of a shot being used in multiple locations, a dupe-neg would be created, or a copy of the original negative that can be put into the film somewhere else. In the case of a dissolve, the outgoing shot will be assembled onto the "A" reel and the incoming shot will be put onto a "B" reel so that the dissolve can be created on the final film out. On certain occasions if there are a rapid succession of cuts or dissolves close to each other, an optical will be created. This optical is a new piece of film that is inserted into the final film rolls.
Today we are seeing more and more films being created from a "DI" or digital intermediate. As the word suggests, the intermediate is the step in between acquisition in the film (analogue) format and the release back to film. In a nutshell the process is shoot in film>edit>scan>conform scans>color correct>add titles>add effects>film out.
Another trend we are seeing is the ability of theaters to play back digital cinema packages instead of film. In this case, the workflow would be the same except for the final step. So you have film>edit>scan>conform scans>color correct>add titles>add effects>digital cinema package creation.
In the case of this project we did not use the optical method for the main reason that we had mixed media formats (35mm and 65mm) that would not physically cut together. Another advantage of the DI work flow is greater control in color correction and the fact that no negative needed to be cut, preserving it for future use if needed.
Of course getting through all of these steps takes careful planning and preparation. To begin lets discuss a fundamental but often overlooked concept in editing film, 24P versus 23.98P
Monday, October 13, 2008
24P vs 23.98P
Although the numbers are similar, the difference between them adds up quickly. I think it's easiest to think of 24 as "film speed" and 23.98 as "video speed." Today we are seeing almost all of the new solid state cameras shooting in 23.98 frames/second, which translates easily to 59.94 via 3:2 pulldown. 59.94 is the broadcast television frequency whether it be 1080i, 720p or 480i. In the case of using these cameras, you would set up your Avid/FCP project as 23.98 fps and you are off the the races. Examples would be Panasonic P2, XDCAM HD, RED cinema, etc.
When FILM is shot and transferred it's typically done so at 24.00 frames / second. In order to get the film into an Avid or NLE it typically comes from a telecined tape. Film is often run as a "one-light" or unsupervised transfer to a Digital Betacam or HDCAM. Once this happens, everything is in the video world and the film is now playing back at 23.98 fps.
Since we shot in film speed (24), will be finishing in film (24) and recorded all of our sound in film speed, it's important to edit in 24fps. The Avid does a great job here by digitizing the telecined tape, ingesting the 23.98 fps material, then playing it back at 24fps in the timeline. Now everything lines up correctly, the lists are correct, etc.
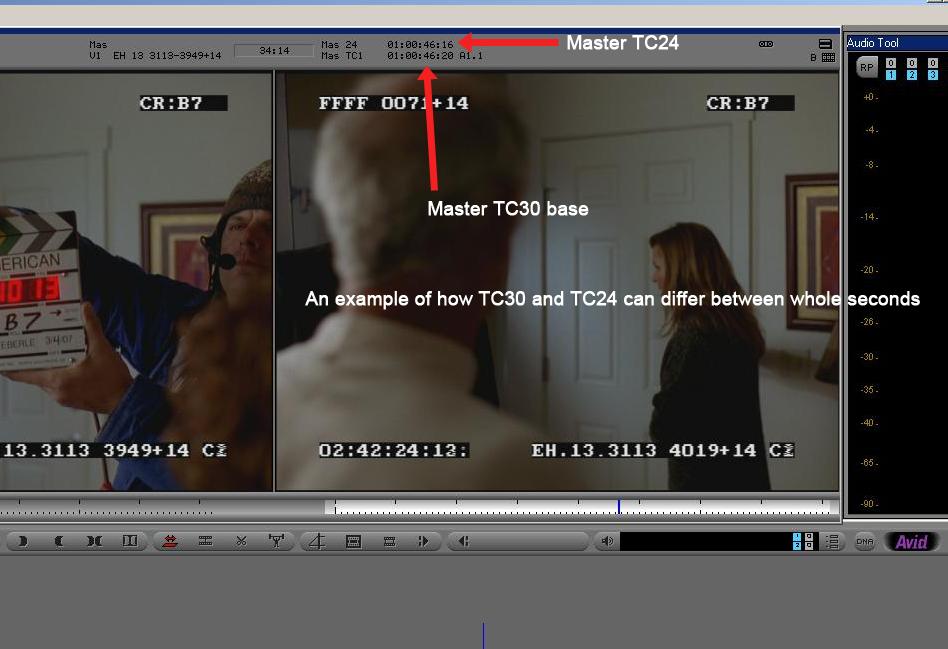
When you working in a 24fps project, the Avid gives you a few ways of looking at timecode. You can either have "regular" TC30 (... :27,28,29,00) or you can have TC24 (... :21,22,23,00) - this can be selected above the master timeline window.

Full Size
The logical question is "how can you have TC30 in a 24 frame timeline?" The answer is the Avid removes numbers from the timecode so that all the seconds will line up. For example 1:00:10:00 will be the same in both timecodes, but between the seconds things might not line up in terms of timecode. For example 1:00:21:11 in TC24 = 1:00:21:14 in TC30. Remember that timecode is simply a bookkeeping device and does not change timing. To make things easy down the road be sure to refer to everything in TC24 - both in terms of your master timeline and your source timecodes.
To make things slightly confusing, in the digital cut tool you have the option of playing the timeline back at 24 fps or 23.98 fps. If you are digital cutting back to tape, select 23.98 and all the timecodes on the tape (video world) will line up with your timecodes in your 24P timeline. Don't worry though, it will slow down the video and audio together to maintain sync but will NOT effect your 24 fps cut lists.
When FILM is shot and transferred it's typically done so at 24.00 frames / second. In order to get the film into an Avid or NLE it typically comes from a telecined tape. Film is often run as a "one-light" or unsupervised transfer to a Digital Betacam or HDCAM. Once this happens, everything is in the video world and the film is now playing back at 23.98 fps.
Since we shot in film speed (24), will be finishing in film (24) and recorded all of our sound in film speed, it's important to edit in 24fps. The Avid does a great job here by digitizing the telecined tape, ingesting the 23.98 fps material, then playing it back at 24fps in the timeline. Now everything lines up correctly, the lists are correct, etc.
When you working in a 24fps project, the Avid gives you a few ways of looking at timecode. You can either have "regular" TC30 (... :27,28,29,00) or you can have TC24 (... :21,22,23,00) - this can be selected above the master timeline window.
Full Size
The logical question is "how can you have TC30 in a 24 frame timeline?" The answer is the Avid removes numbers from the timecode so that all the seconds will line up. For example 1:00:10:00 will be the same in both timecodes, but between the seconds things might not line up in terms of timecode. For example 1:00:21:11 in TC24 = 1:00:21:14 in TC30. Remember that timecode is simply a bookkeeping device and does not change timing. To make things easy down the road be sure to refer to everything in TC24 - both in terms of your master timeline and your source timecodes.
To make things slightly confusing, in the digital cut tool you have the option of playing the timeline back at 24 fps or 23.98 fps. If you are digital cutting back to tape, select 23.98 and all the timecodes on the tape (video world) will line up with your timecodes in your 24P timeline. Don't worry though, it will slow down the video and audio together to maintain sync but will NOT effect your 24 fps cut lists.
Sunday, October 12, 2008
Project Setup and Ingestion
As noted before, be sure to use the 24P setting when creating the project. In our case we used Digibeta tapes so our project was standard definition. If working in high def you could use 1080i/24P and everything would work the same. Once the material is ingested you can edit like any other project and digital cut back to tape for screening. In our case we would do a preview digital cut and take the video out into a projector for reviews.
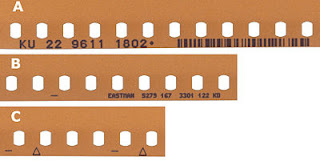
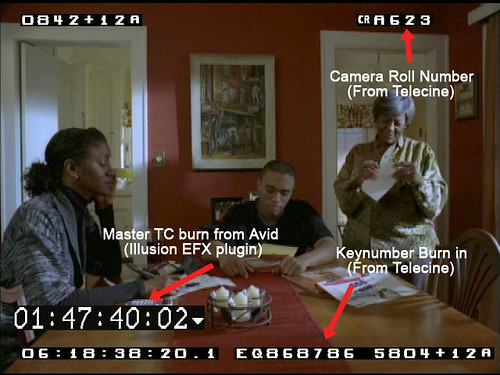
Typically after the film is telecined the transfer house will provide an .ale file or a .flx file on a disk. These files simply contain data about the material that was telecined, mainly camera roll, tape name, start and end source TC, keycode number and film type (35mm 4 perf, etc). The keycode, also known as edgecode or keynumber (KN) is a string of numbers written onto negative that assign each frame a specific value. These keynumbers, or KN for short, can be read by film scanners via a barcode. Here is a picture of keynumbers on a piece of film.
Avid allows you to import the .ale files into your bin under File>Import. If the file is a .flx file, you can convert it to an .ale file by using Avid Log Exchange. I liked using "Raw" bins that contained all my imported 35mm footage and 65mm footage. Once the material was digitized I would make subclips as needed for my different scenes. After importing the .ale files there are certain things you want to check BEFORE starting any editing.
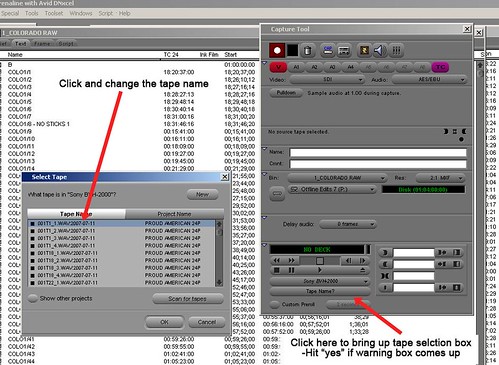
-Tape Name: This is very important to get right from the very start, otherwise it will be problematic later as many of the .EDL formats only read the first 8 letters of the tape. I suggest using a numbered system (101, 102, 103) and keep it at 8 characters or less. Typically the tape names from the telecine logs aren't what you want them to say. You can change them AFTER import by opening the digitize tool. Click on the "tape name" under the play button which will bring up a box with the existing tapes in your project. Click on the tape name you want to change and type the new name. It will ripple change everything from the old tape name to the new tape name.
Full Size
-Source TC 24: For list creation later, it is a good idea to create a TC24 column for your SOURCE material. In your "Raw" bin under the "text" bin view, click on the "Start" timecode column heading. When you do this it will highlight the entire start column. Click control+D or command+D on a Mac and it will ask you where you want to duplicate the values to. Choose TC24 and it will paste the timecode values into this column. For an explanation of TC24 see my earlier post.
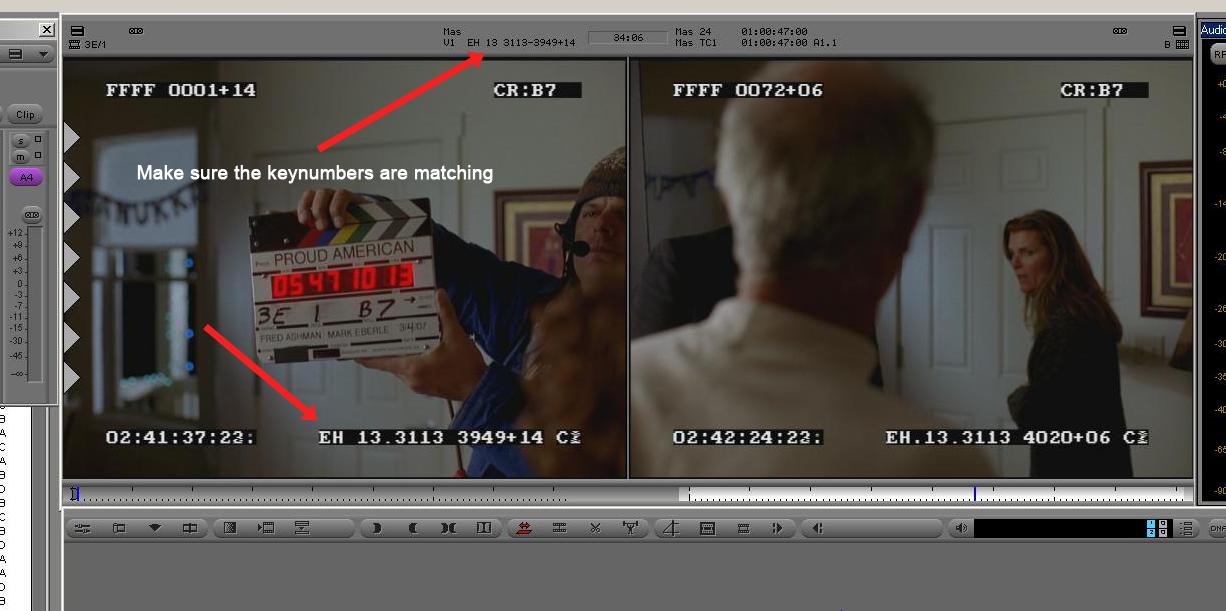
-Confirming KN numbers match: When you import your .ale, the "KN Film" column will be populated with the film type for the camera roll. If the roll is 35mm 4 perf, then the number should be 35.4, if the roll is 65mm 15 perf then the number should be 65.15. As long as the first frame keynumber is correct and the "KN Film" is correct the numbers should track fine. You can check this by loading a digitized clip in the source monitor and comparing the keynumber window burn on the picture with the Avid keynumber above the source monitor. Be sure to select the source TC type above the source window to display the "EC1" which stands for edgecode1. As you scroll through the clip the numbers should always match.

Full Size
*Note: Once you import an .ale file with a "KN Film" type, you will not be able to modify it. So if for some reason the film type is incorrect on the .ale you must open the .ale in a text edit program and replace the values with the correct film type, save, then import the .ale. You could also modify a keynumber if it was wrong for some reason. I did not have any incorrect numbers in my project but it could happen (that's why we check before starting the edit).
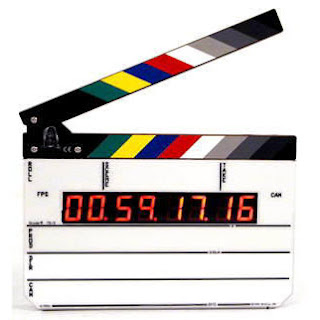
-Syncing Audio: For film projects the audio is recorded separately. In the old days the DAT tapes where used, but now people are using flash-based field systems. In the case of our project all the files were delivered as .wav files with embedded timecode that matched the smart slate. The smart slate (clapper) was shot before each scene and clapped. The audio was then imported and matched to the timecode on the smart slate as the clap occurred. Be sure your audio guys voice slate each take as they are recording, this will help you ID what scene you are on if you get lost. This is very helpful, trust me. Here is a smart slate picture.
-Autosyncing: I found it helpful to create a new "syncing" bin which I would drag the marked video and audio clips into. Mark your video in point where the clapper comes together and your audio in-point when you hear the clap. I recommend going frame to frame to get a good indication of when the clap occurs; the timecode from the .wav file is not always perfectly indicated on the smart slate frame (be sure to have CAP LOCK on so audio scrubbing is active). Then, after highlighting both clips, go to the menu Bin>Autosync, then choose "using in points" from the dialogue box. This will create a synced clip which you can then move into a "synced" bin for editing.
Typically after the film is telecined the transfer house will provide an .ale file or a .flx file on a disk. These files simply contain data about the material that was telecined, mainly camera roll, tape name, start and end source TC, keycode number and film type (35mm 4 perf, etc). The keycode, also known as edgecode or keynumber (KN) is a string of numbers written onto negative that assign each frame a specific value. These keynumbers, or KN for short, can be read by film scanners via a barcode. Here is a picture of keynumbers on a piece of film.

Avid allows you to import the .ale files into your bin under File>Import. If the file is a .flx file, you can convert it to an .ale file by using Avid Log Exchange. I liked using "Raw" bins that contained all my imported 35mm footage and 65mm footage. Once the material was digitized I would make subclips as needed for my different scenes. After importing the .ale files there are certain things you want to check BEFORE starting any editing.
-Tape Name: This is very important to get right from the very start, otherwise it will be problematic later as many of the .EDL formats only read the first 8 letters of the tape. I suggest using a numbered system (101, 102, 103) and keep it at 8 characters or less. Typically the tape names from the telecine logs aren't what you want them to say. You can change them AFTER import by opening the digitize tool. Click on the "tape name" under the play button which will bring up a box with the existing tapes in your project. Click on the tape name you want to change and type the new name. It will ripple change everything from the old tape name to the new tape name.
Full Size
-Source TC 24: For list creation later, it is a good idea to create a TC24 column for your SOURCE material. In your "Raw" bin under the "text" bin view, click on the "Start" timecode column heading. When you do this it will highlight the entire start column. Click control+D or command+D on a Mac and it will ask you where you want to duplicate the values to. Choose TC24 and it will paste the timecode values into this column. For an explanation of TC24 see my earlier post.
-Confirming KN numbers match: When you import your .ale, the "KN Film" column will be populated with the film type for the camera roll. If the roll is 35mm 4 perf, then the number should be 35.4, if the roll is 65mm 15 perf then the number should be 65.15. As long as the first frame keynumber is correct and the "KN Film" is correct the numbers should track fine. You can check this by loading a digitized clip in the source monitor and comparing the keynumber window burn on the picture with the Avid keynumber above the source monitor. Be sure to select the source TC type above the source window to display the "EC1" which stands for edgecode1. As you scroll through the clip the numbers should always match.
Full Size
*Note: Once you import an .ale file with a "KN Film" type, you will not be able to modify it. So if for some reason the film type is incorrect on the .ale you must open the .ale in a text edit program and replace the values with the correct film type, save, then import the .ale. You could also modify a keynumber if it was wrong for some reason. I did not have any incorrect numbers in my project but it could happen (that's why we check before starting the edit).
-Syncing Audio: For film projects the audio is recorded separately. In the old days the DAT tapes where used, but now people are using flash-based field systems. In the case of our project all the files were delivered as .wav files with embedded timecode that matched the smart slate. The smart slate (clapper) was shot before each scene and clapped. The audio was then imported and matched to the timecode on the smart slate as the clap occurred. Be sure your audio guys voice slate each take as they are recording, this will help you ID what scene you are on if you get lost. This is very helpful, trust me. Here is a smart slate picture.

-Autosyncing: I found it helpful to create a new "syncing" bin which I would drag the marked video and audio clips into. Mark your video in point where the clapper comes together and your audio in-point when you hear the clap. I recommend going frame to frame to get a good indication of when the clap occurs; the timecode from the .wav file is not always perfectly indicated on the smart slate frame (be sure to have CAP LOCK on so audio scrubbing is active). Then, after highlighting both clips, go to the menu Bin>Autosync, then choose "using in points" from the dialogue box. This will create a synced clip which you can then move into a "synced" bin for editing.
Saturday, October 11, 2008
Prepping for FilmScribe
After getting all your material digitized and edited you can begin the process of getting the film scanned and put into the DI phase. Avid's tool for creating scan lists is called FilmScribe and has been around for quite a while. Final Cut Pro has a similar tool. In terms of Avid, do the following.
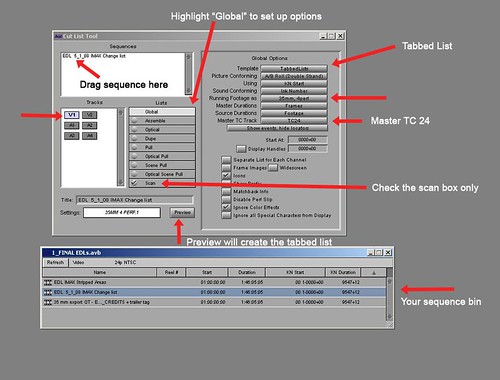
Make a new bin and call it "FilmScribe" or something similar. Duplicate your timeline and drag it into the new bin. Rename the timeline to "Filmscribe_Date_Time" - for example Filmscribe_Oct21_3pm. This will help you keep track of what lists go with what timelines, which helps if there are changes or multiple exports.
Put all video tracks onto one layer if possible, it makes for a cleaner list. If you must have something on V2 (a picture in picture, etc) it will be ok for the scanning list output, but V2 will need to be exported separately for the .EDL (see later post about .EDLs).
Remove all match frames from the timeline. If you don't do this it will create multiple scans for the same shot which is not a good thing.
Save and close your FilmScribe bin.
Open the FilmScribe application, this is a separate program from the Avid. You can also go Output>FilmScribe, which launches the program.
Friday, October 10, 2008
Using FilmScribe
After opening FilmScribe and while in the application, go to File>Open and navigate at the finder level to the bin you created for FilmScribe, this will open a window in which you can see your sequence. Drag your sequence into the FilmScribe sequences window, then select the appropriate video tracks (no need to select audio tracks). As I mentioned before it's cleanest to get everything on one video layer. It's also important to get all the global settings correct so your scan list is appropriate. I have created a frame grab which outlines this.
Full Size
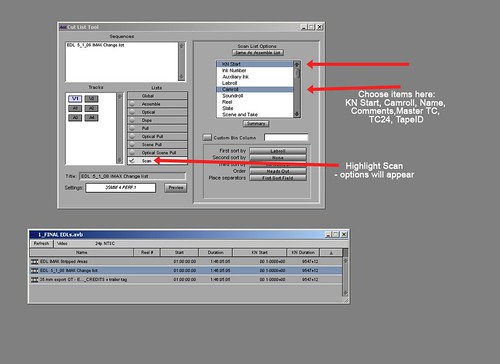
FilmScribe has many great features, including web lists, but I've found that the scanning houses want simple, Microsoft excel style lists of only the needed columns: Camera Roll, Tape Name, Source TC24 Start/End, Keynumber (KN) Start/End and Master Start TC24 Start/End. Every time I used a web list they would have me re-export as a tabbed file. Here is where you select the columns for the scan list.
Full Size
Once you have your settings correct, go ahead and hit the "preview" key and pick a place to save the .txt file for the scan list. After it saves, open the file in text edit, command+A to select all, command+C to copy, open excel and paste everything into a spread sheet. I then like to clean everything up for the scan house by eliminating the columns that are not needed. Note again that the columns they are using consist of Camera Roll, Tape Name, Source TC24 Start/End, Keynumber (KN) Start/End and Master Start TC24 Start/End.
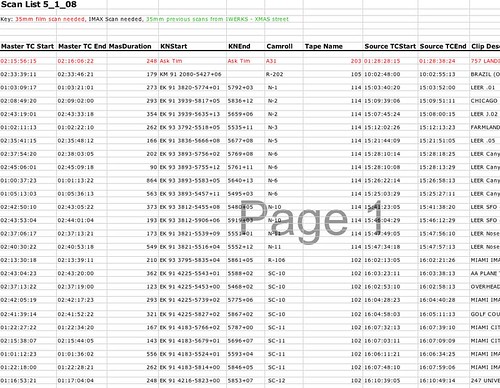
One thing to note: If you use a shot multiple times, it will appear in the scan list multiple times. In our case, the scanning house determined where the overlap(s) were and scanned the shot to encompass the far ends of the spectrum. This avoided scanning frames twice, which saves money and hard disk space. Just make sure they are alerted to duplicates if they exist. Here is an example of a finished excel sheet that was sent to the scanners.
Full Size
Full Size
FilmScribe has many great features, including web lists, but I've found that the scanning houses want simple, Microsoft excel style lists of only the needed columns: Camera Roll, Tape Name, Source TC24 Start/End, Keynumber (KN) Start/End and Master Start TC24 Start/End. Every time I used a web list they would have me re-export as a tabbed file. Here is where you select the columns for the scan list.
Full Size
Once you have your settings correct, go ahead and hit the "preview" key and pick a place to save the .txt file for the scan list. After it saves, open the file in text edit, command+A to select all, command+C to copy, open excel and paste everything into a spread sheet. I then like to clean everything up for the scan house by eliminating the columns that are not needed. Note again that the columns they are using consist of Camera Roll, Tape Name, Source TC24 Start/End, Keynumber (KN) Start/End and Master Start TC24 Start/End.
One thing to note: If you use a shot multiple times, it will appear in the scan list multiple times. In our case, the scanning house determined where the overlap(s) were and scanned the shot to encompass the far ends of the spectrum. This avoided scanning frames twice, which saves money and hard disk space. Just make sure they are alerted to duplicates if they exist. Here is an example of a finished excel sheet that was sent to the scanners.
Full Size
Thursday, October 9, 2008
Scanning Primer
In terms of scanning 35mm, the typical frame sizes are 2K or 4k. In terms of the larger 65mm frame sizes you can get up to 8K or even 12K resolutions. After being scanned, each frame is saved out in a certain file format which can be read by the conforming edit system, in our case it was a Quantel IQ with a Pablo card. The Pablo card enables it to work in a 4K resolution. Here are some descriptions of the file formats.
2K: Describes a horizontal resolution of 2048 pixels. Scanning full-frame 35mm film produces an image size of 2048x1556. 2K is today the most common DI scanning resolution, as well as post production workflow, incorporating 2K projectors, 2K capable color correction suites and effects workflows.
4K: Describes a horizontal resolution of 4096 pixels. Scanning full-frame 35mm film produces an image size of 4096x3112 (or 4096x3072). 4K, although 4 times the area of 2K, is not yet as widely used throughout the entire post production pipelineCineon: Developed by Kodak. The Cineon file format was designed for scanning film for digital film work like effects, digital color timing and the creation of digital intermediates. It is an RGB bitmap10-bit log file that corresponds to the density of the film negative, preserving the original gamma. It can hold an exposure range of approximately 11 stops. Support for up to 16-bit depth per channel.
DPX: (Digital Picture Exchange). File format used in high end applications like film scanning for use in digital film work, like effects, digital color timing and creation of digital intermediates. 10-bit log file preserves image densities similar to Cineon format. Standardized by ANSI/SMPTE 268M-2003. Similar to the Cineon file format except that DPX can store more header information and image data information. This format has become quite popular lately for this type of high-end digital film workWednesday, October 8, 2008
Scanning Workflow
In our case, after we created the excel sheets for the 35mm film we emailed them to our scanning house - Modern Video Film in LA. On the excel sheet I had everything sorted by reel number so I was able to send them only the 35mm stuff. They input all the data into the machine and starting loading the reels. There were thousands of scans, but to walk you through the process for a given shot:
The scanner asks for a certain camera roll - say 101. The scanner then reads the start KN and rolls to that number by reading the edgecode on the film. The scanning begins and lasts for the appropriate duration based on the end KN. After the scan is complete, the Cineon file is stamped with the metadata we've been discussing: Camera Roll, Tape Name, Source TC24 Start/End, Keynumber Start/End and Master Start TC24 Start/End. After all the scanning is complete, a hard drive will all the files is sent to the conforming facility, in our case Digital Jungle in Burbank. The conforming house uses the .EDL from the Avid to line up all the scans - all of which popped right into place. To learn about how to make the .EDL properly read the next post.
In terms of scanning the 65mm, 15 perf it was not so automated or easy. There are only a few machines that scan negative that large, and those that do can't embed metadata or read edgecodes. So, long story short, for the smaller amount of 65mm film that needed to be scanned, all the edgecodes needed to be translated to feet/frames and all the metadata needed to be entered manually. With all the human intervention we ended up needing to re-scan certain shots. Luckily scanning 65mm is not something that is very common, but the good news is that the Avid will keep accurate track of all the edgecodes for this format.
Tuesday, October 7, 2008
Creating an .EDL, QuickTime and Audio Track
So to recap where we are at this point: Film was shot, telecined to tape and ingested into a 24p project. We confirmed the edgecodes (key numbers) were being tracked properly, we synced up the audio and we edited our film. We prepped for FilmScribe and created a scan list. The film was scanned and sent to the conforming house.
So how does the conforming house, where "onlining" of the DI is to take place, assemble all the scans in the right order? The answer is lies in three items: an .EDL, a QuickTime reference movie and an audio mix.
EDLs have been around for a long time give basic information about your timeline, mainly where the master start / end for a given edit lies and what source start / end and tape name fill the hole. If you recall, this same information was embedded into scans as metadata. After importing the .EDL into the Quantel it uses an autoconform feature to start looking for scans that fit the correct holes. If the first shot in the timeline runs from 1:00:00:00 - 1:00:12:12 the .EDL will instruct it to look for a source shot with a particular camera roll and source TC start / end. There will only be one shot that fits that hole.
A QuickTime movie will allow the conforming editor to confirm the right shots are occurring at the right times. Be sure to export your QuickTime movie starting at 1:00:00:00 and burn a master timecode window onto the screen, that way there is no room for error. For my project, I created one such "burned" QuickTime that had all the edgecodes visible and a master TC window, but also created a 1.85 matted version that represented what the final film was to look like. Since 65mm film is typically framed at 4:3, they had to move some of the shots up or down to fit in the 1.85 framework.
Full Size
Audio track: Be sure to also export your soundtrack starting at 59:50:00 and place a 2-pop for one frame at 59:58:00, with audio mix starting at 1:00:00:00. They will line this up using the 2-pop. Be sure to note that the audio is running at 24fps (film speed), I did this by physically naming the file what is was "Audio_mix_59_50_00_24fps.wav."
Ok, get ready for this... the Quantel Runs at 23.98 so they pull the audio down to match the video speed. If they don't slow the audio down everything will be out of sync. Don't worry though, everything will end up 24fps in the end and your lists are all correct, but for whatever reason the Quantel slows everything down to video speed - probably so they can layoff to HDCAM or DBC for screenings. Enough on that.
Monday, October 6, 2008
.EDL creation tips
Avid's .EDL manager has been known to be a little buggy so here are a few tips to insure minimal frustration:
Be sure to use the bin with your most recent filmscribe sequence. It is VERY IMPORTANT you use the exact same sequence for your .EDL, otherwise your scans won't line up.
One tip I found to work well is trashing the EDL manager prefs (at the finder level) before starting the application. I was having issues getting sequences to load, but after trashing the prefs it all seemed to work ok.
Launch the EDL manager program or, from the Avid, choose Output>EDL. Similar to FilmScribe, the interface will open. From within EDL manager choose File>Open and navigate to the FilmScribe bin with your prepped timeline (see earlier post for prepping info). The sequence will load into the EDL manager and create a list which can be saved out, zipped and emailed to the DI conforming house.
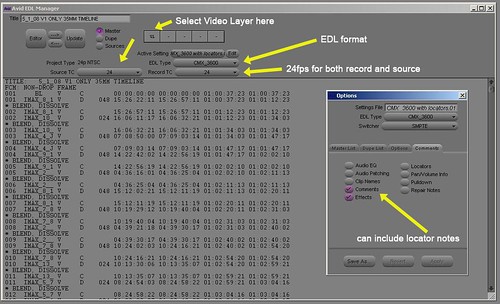
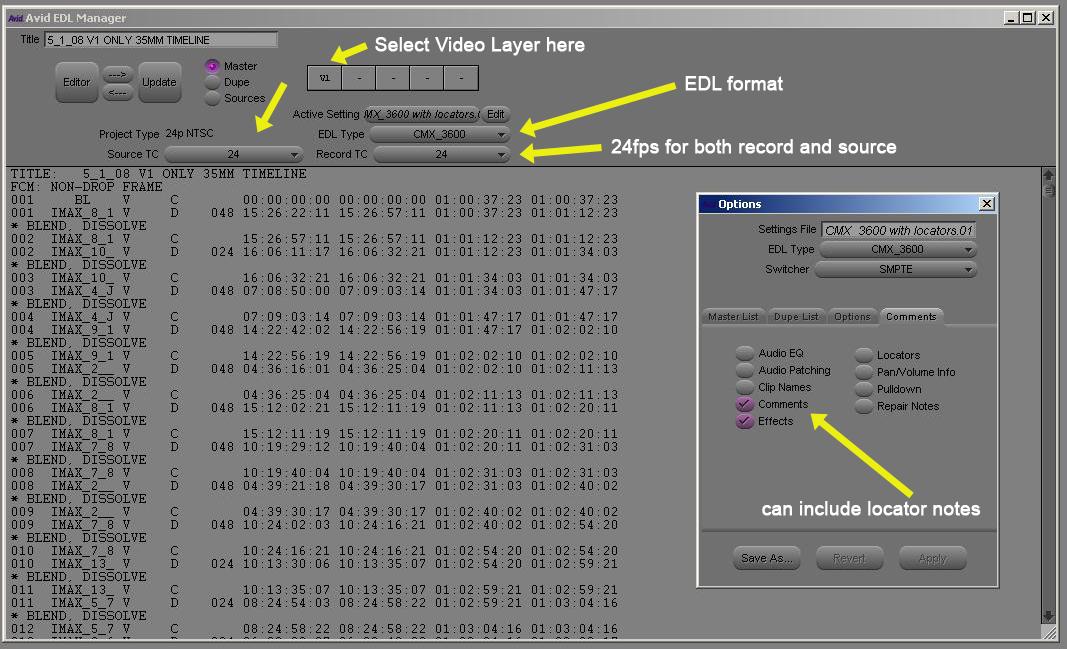
EDL formatting is important. Most houses that I have worked with request CMX3600 EDLs with record and source TC24. They also will request each video layer as a separate EDL. If you have two video layers (V2 with titles for example) you will need to create a separate EDL for each video layer. I have created a picture that highlights the settings. Keep in mind that EDLs are essentially cuts and dissolves, so if you have a bunch of Avid EFX happening the conform house will need to reference your QuickTime movie to see what's going on.
Full Size
I have heard that if you still are having EDL errors after trashing the prefs and moving everything onto one video layer you might try decomposing (deselect offline media box) your EDL timeline so new clips are created. Yes, all the clips will be offline but it does not matter because we are only concerned with the metadata. This goes without saying but DON'T DECOMPOSE YOUR MASTER TIMELINE, just the prepped copy of that you created for FilmScribe / EDL manager.
Be sure to use the bin with your most recent filmscribe sequence. It is VERY IMPORTANT you use the exact same sequence for your .EDL, otherwise your scans won't line up.
One tip I found to work well is trashing the EDL manager prefs (at the finder level) before starting the application. I was having issues getting sequences to load, but after trashing the prefs it all seemed to work ok.
Launch the EDL manager program or, from the Avid, choose Output>EDL. Similar to FilmScribe, the interface will open. From within EDL manager choose File>Open and navigate to the FilmScribe bin with your prepped timeline (see earlier post for prepping info). The sequence will load into the EDL manager and create a list which can be saved out, zipped and emailed to the DI conforming house.
EDL formatting is important. Most houses that I have worked with request CMX3600 EDLs with record and source TC24. They also will request each video layer as a separate EDL. If you have two video layers (V2 with titles for example) you will need to create a separate EDL for each video layer. I have created a picture that highlights the settings. Keep in mind that EDLs are essentially cuts and dissolves, so if you have a bunch of Avid EFX happening the conform house will need to reference your QuickTime movie to see what's going on.
Full Size
I have heard that if you still are having EDL errors after trashing the prefs and moving everything onto one video layer you might try decomposing (deselect offline media box) your EDL timeline so new clips are created. Yes, all the clips will be offline but it does not matter because we are only concerned with the metadata. This goes without saying but DON'T DECOMPOSE YOUR MASTER TIMELINE, just the prepped copy of that you created for FilmScribe / EDL manager.
Sunday, October 5, 2008
Color Grading, Titles and Reel Breaks
Now that everything is in the DI state, all the final color correction (grading) can begin. The advantage to color correcting in this format is that you have many more options than in traditional optical printing which relies on a series of printer lights to set contrast / brightness / color, etc.
The DI is kind of like Photoshop for video in that you can create power windows, specific looks, glows, primary and secondary color correction, etc. Of course this can also be a bit of a curse if you spend too much time on it.
After all the scenes are colored to your specs, titles are added. In our case we provided a word doc with all the opening and closing credits. The Quantel editor, John, looked at my reference movie to see where everything went. I did provide him with an EDL of the titles layer which showed all the start / ends but he did it by eye. We also had an opening animation that was created in 4K in AfterEffects / Maya and imported into the DI as a .tiff image sequence.
Next come the reel break points. This was a new concept to me and I needed a little primer. Basically when you create a 35mm film it is done in multiple reels - either 1500 feet (16 minutes) or 2000 feet (22 minutes). Check with your lab to see what reel lengths they will be using. These reels are then labeled and sent to the movie theatres to be assembled together in order on a platter which feeds into the projector. You, as the editor, need to tell the digital conform house where these breaks fall. They should not occur over the top of music, dialogue or with anything white or light in the background. You want to maximize the amount you can fit onto each reel so you don't end up with a short reel at the end of the line.
Saturday, October 4, 2008
Filming Out
At this point the DI is ready to be filmed out. Before we discuss these methods, which apply to most theaters in the US, it is worth mentioning again that at this stage of the game you have other options for delivery. From the Quantel you can quickly run off HDCAM SR copies or BluRay disks which can be used for special / investor screenings. Many film festivals will allow you to submit in HDCAM, HDCAM SR or D5, all of which can be created from the DI. You can also create a Digital Cinema Package for digital theaters. This is not as simple as creating a tape or BluRay, as it involves a ton of rendering to create the encrypted / JPEG2000 compressed files. Once the package is created, hard drives can be sent to the theaters where they are played back via a "digital handshake" with certified projectors. As another copyright protection the files will often expire after a certain time period and need to be renewed.
I can tell you though that the digital images look pretty darn good, at least in the theatre I watched the movie in.
In terms of the film out for the rest of the theaters, the DI edit system will export each reel out in a particular file format. That large file is then written, frame by frame, to a reel of film by a laser, for example the ARRILASER. This is a time consuming process but when it is all said and done you have your negative master for each reel. At this point we are going from the digital realm back to the analogue realm.
Friday, October 3, 2008
Dolby Digital
While the film side of things is going on, the audio is dealt with in a different fashion. There are a few types of film audio out there, mainly Dolby Digital, SDDS (Sony) and THX (Lucas). In each case the audio is processed and read differently. Each theatre must have the proper decoding equipment to play the sound back properly. We chose Dolby Digital because it had a wide adoption and was less expensive to license.
After paying the licensing fee to Dolby, they send out an engineer to create a MO (Magneto Optical) disk for each reel. He/she basically checks that the 5:1 mix is up to their standards and sets some levels/applies some filters. Typically at this stage the Dolby guy will want to make sure he is looking at a physical representation of each film out reel. This physical medium can be a Digital Beta tape output from the Quantel. The Dolby guys tend not to like QuickTime movies as they are not a "physical" reference such as a digital cut or a "dirty dupe" telecine of each reel's negative. They also use 2POPs on the film out reels and the audio mix to confirm lineup.
The MO disk is then used to create Dolby film strips for each reel. The final step is to marry the Dolby print and the master negative together to make your answer print (which is a interpostive). The Dolby information is written between the sprocket holes of the 35mm film on the answer print and is read by a decoder on the film projector. Here is a photo of what Dolby looks like.

If the audio on the answer print does not line up for whatever reason (which is common), then you adjust the relationship between the master negative and the Dolby strip and create a new answer print for that reel.
Thursday, October 2, 2008
Answer Print and Duplication
Once the answer print is lined up you want to make sure the color corrections made in the DI world are coming across to the film. There are various LUT (look up tables) used to insure the film stock will match the color correction, but we found that it takes a few tests to get the right translation. Remember, once you go to a negative you are in the analogue world which works with printer lights and chemicals.
After everything looks good, the basic premise is to create a Inter-Positive>Inter-Negative>release prints to the theater. The lab calculates how many of each you will need b/c you can only make a certain number of Inter-Negs from an Inter-Pos and so on.
After everything looks good, the basic premise is to create a Inter-Positive>Inter-Negative>release prints to the theater. The lab calculates how many of each you will need b/c you can only make a certain number of Inter-Negs from an Inter-Pos and so on.
Wednesday, October 1, 2008
Summary
It's great to know the Avid as well as other platforms can handle the bookkeeping of edgecodes and let you worry about the creative side of things.
I must say however that going from film to digital and back to film seems a little backwards to me. Yes it looked fantastic but it was quite a bit of time and money to get everything scanned and dust busted (removing dust particles captures during the scan). Having said that, 35mm film still offers a great look and does have quite a bit of exposure latitude. I think the trend will be going to digital capture (RED Cinema, Panavision Genesis, Thompson Viper, etc) and entering straight into that DI environment. At the moment, however, if you going to do wide release there are still many theaters that only take film reels, so you will still need to film out.
It is worth noting that FilmScribe does a great job at creating lists for the traditional optical workflow (see earlier post for comparison of optical vs. scanning). In fact the "scan" option was added only recently. Cutting of negative and splicing it back together is on it's way out however and you can appreciate this by the fact that we work in NON-linear environments everyday. Scanning and DI is still pretty expensive though, so if you are going to shoot on film, finish back to film and have a limited budget you might look into your options for staying in an optical workflow.
Info on our independent film can be found at www.proudamericanfilm.com. We had a wide release, although it was a short release. BluRay DVDs will most likely follow.
Subscribe to:
Posts (Atom)